1/15/13

Roasted Veggie & Black Bean Tamale Bake


Eating vegan is no big deal.  I mean, don't get me wrong, the thought of eating vegan for a month freaked me out, but once I got into the groove of it (read: found a suitable half and half substitution for my coffee) it's no biggie.  I've made several vegan meals and my family of five has enjoyed them all, which is super exciting!

This recipe I adapted from the chicken tamale bake, and despite the vegan adaptions, it was great.  If you're  eating vegetarian feel free to use a real egg in place of the flax egg and sprinkle some cheddar cheese on top. If you have time to roast the veggies ahead of time that will make putting this meal together even faster.

Roasted Veggie & Black Bean Tamale Bake

2 small yellow squash or zuchinni, thinly sliced
1 small yellow onion, thinly sliced
2 bell peppers, any color, thinly sliced
1 can black beans, drained very well (I dried mine with a paper towel!)
1 box jiffy corn muffin mix
1 Tb flax meal + 3 Tb. water (or 1 egg)
1/3 c. milk of your choice (I used soy milk)
1 can creamed corn
1 tsp. cumin
dash of cayenne pepper
1 10 oz can enchilada sauce

Preheat the oven to 425.  Layer the yellow squash on one cookie sheet and the peppers and onions on a another cookie sheet.  Bake 10 minutes then stir with a spatula and rotate the pans.  Bake another 10 minutes.  At this point the squash should be cooked but the peppers may need longer.  Cook peppers & onions until they are soft.  Remove the veggies from the oven and then them cool.  
 
Turn the oven down to 350 and spray a 9x13 pan with cooking spray.  In a small bowl or ramekin mix the flax meal with the water and let it stand 5 minutes.  Stir the flax egg before dumping it into the corn mixture. Mix together the corn muffin mix, flax egg, milk, creamed corn, cumin & cayenne pepper and stir well to combine.
 
Pour the corn mixture into the 9x13 pan and bake for 20 minutes.  Remove from oven and poke holes in the corn cake with a fork.  Pour the enchilada sauce over the corn cake and then layer on the roasted veggies and black beans.  Return to the oven another 15-20 minutes or until the corn cake is cooked through.  Top with sour cream or tofutti "Better than Sour Cream", if desired.
 
 
post signature

1/8/13

Spicy BBQ Chickpea Burgers


This burger is really good.  I would highly recommend not telling your kids it's a "burger" or else they'll be expecting a beef patty with ketchup & American cheese and I could see how that would be disappointing! I told my kids we were having sandwiches and they ate them happily.  

I found this burger on one of my favorite vegan blogs, Oh She Glows.  I did make a couple changes to make it simpler and more to our liking but for the most part, her recipe was amazing!  I just made these for the second time yesterday and I minced the veggies as small as possible without pulverizing them, and pulsed the chickpea mixture a little more in the food processor to make it a stickier batter and the burgers held together better when I cooked them.  You could definitely make this without a food processor but you'll need to mash the chickpeas with the rice really well with a potato masher or fork.  I recommend minute rice because it seems to cook softer (and much faster) and you want the rice soft to bind the burger together.  Either white or brown rice is fine, depending on what you like and what you  have on hand.

Spicy BBQ Chickpea Burgers, Vegan
recipe adapted from Oh She Glows

3/4 c. minute rice (white or brown)
2 cans chickpeas, drained well
1/4 c. minced red onion
1/2 c. minced red or yellow bell pepper
1 jalapeno, ribs & seeds removed, minced
1 small carrot, grated
3 garlic cloves, pressed or minced
1/4 c. chopped cilantro
1/4 c. bbq sauce
1/2 tsp. Tony's (or other seasoned salt + dash of cayenne)
1/2 tsp. sea salt
2 Tb. ground flax seed

Prep the veggies before cooking the rice.  Put the rice in the microwave or cook on the stove as directed.  Drain the chickpeas well and add to the bowl of your food processor.  Once the rice is done add the hot rice to your food processor and pulse until combined, leave a few small chunks.  Don't try to use cold rice because it gets too firm.  Once the chickpea/rice mixture is ready pour it into a mixing bowl and add the veggies, cilantro, bbq sauce, seasoning and flax.  Combine well.  Taste and adjust seasoning.  Form into patties, packing the burger mixture tightly.  Preheat a skillet, I recommend cast iron, to medium-high heat.  Cook the burgers 3-4 minutes on each side until browned well and warm throughout.  Serve on toasted buns with lettuce, tomato, onion and bbq sauce.  We ate these with oven fries.


post signature

1/3/13

Vegan Black Eyed Pea Bowls with Red Hot Tahini


Apparently I'm on Christmas Break too...but trying to get back into the swing of things, and back into the healthy eating swing especially! WAY too many cookies, chocolate pretzel bark, au gratin potatoes, shrimp scampi, etc... 

This month on Cracked Up Kitchen I will feature healthy recipes with vegan recipes at least once a week.  I know, I know, don't freak out.  I will throw a couple fun recipes in there also, but I know most people are trying to eat healthier in the new year and I think eating vegan gets a bad rap.  Lots of people think vegans eat weeds from the backyard and wear hemp cologne and smoke pot are hippies.  But vegan food can be delicious and even your family could like a recipe or two if you tried it.  

Now, we have no intentions of becoming permanently vegan or even vegetarian, we just want to attempt to eat healthier, reduce our animal product consumption, and be fit.  I have committed to eat vegan for the month of January (six days a week;) so I will be trying out lots of new recipes and I'll tell you how it goes! 

Today's recipe was a three thumbs up meal for the entire family.  As I was assembling my kids' bowls I said a little prayer that I would be patient if they were grossed out by it.  Which was completely the opposite of their reactions.  Two of my three little eaters ate seconds and Robbie immediately said, "Wow mom, this is good!" So if you're contemplating trying a vegan meal, try this!  I found this recipe at Post Punk Kitchen and I would've never thought I should make it just by  looking at the recipe but her photo was so delicious looking I had to try it and am so glad I did.  I realize that eating black eyed peas (Hoppin' John) is traditionally done on New Year's Day but I didn't feel like cooking so whatever!

A couple short cuts: You can absolutely use 2 cans of black eyed peas instead of cooking from dried.  I was really short on time yesterday so I used 2 cans of collared greens instead of sauteing my own, but fresh would be just perfect, probably better. Prep ahead of time, you can make the tomato salad, peas, rice & sauce ahead of time and reheat when you're ready to eat.  That's what I did and it made getting dinner on the table super quick.

Vegan Black Eyed Pea Bowls with Red Hot Tahini
recipe adapted from Post Punk Kitchen

Hoppin' John
1 lb bag dried black eyed peas
1 Tb. liquid smoke
2 bay leaves
salt
water

Greens:
2 cans collared greens, drained
granulated garlic &seasoned salt for seasoning

Tomato Salad:
2 c. chopped tomatoes, about 3 big roma tomatoes
3 large green onions, sliced thinly
1/3 c. fresh parsley, finely chopped
salt & pepper
2 Tb. red wine vinegar

Red Hot Tahini
1/2 c. tahini
1/3 c. Frank's Red Hot sauce
2 cloves garlic, minced
1/4 c. water (or more)

6 c. cooked rice for serving, whatever kind you like.  I used long grain & wild rice.

You can cook your black eyed peas on the stove or in a crockpot, keep in mind they cook faster than typical beans. Either simmer the peas in water with the liquid smoke and bay leaf 30 minutes or until al-dente, OR add the peas to a slow-cooker, cover them with water, add liquid smoke & bay leaves and cook on low 2-3 hours. Drain water & remove the bay leaves before serving.

While the black eyed peas are cooking make the tomato salad by combining the chopped tomatoes, green onions, parsley, salt, pepper & red wine vinegar in a bowl and refrigerate until you are ready to serve.  To make the red hot tahini sauce add all ingredients to a blender jar and blend until smooth.  You may want to add more water to get a consistency that's good for drizzling.  Directly before serving heat the greens & seasonings until hot.  To assemble the black eyed pea bowls layer rice, black eyed peas, greens, tomato salad & drizzle the top with the red hot tahini.  Enjoy! I love the mix of hot rice, beans & greens topped with cold tomatoes and sauce.  So yummy!
 
 
post signature

12/22/12

Last Minute Christmas Food Gifts!


Not that I'm suggesting that anyone has been procrastinating on your Christmas baking....but just in case, here are some great last-minute Christmas food gifts or they would also make a great hostess gift if you're going to someone else's home for the Holidays.


My personal favorites require very few ingredients and no actual "baking":

This is so yummy stirred into coffee!


OR
 

post signature

12/19/12

Peppermint White Chocolate Pretzel Bark


My mom was visiting a few weekends ago and she ran into Trader Joe's for a couple things and came out with a bag of white chocolate peppermint covered pretzels.  They were SO good.  I wanted to make some but I really, really didn't like the idea of individually dipping small pretzels. Honestly I'm kind of lazy and don't do complicated stuff very often.  And, my family can blow through a whole  bag of these in no time flat so it seems like a lot of work to see them disappear so fast.  This way took 10 minutes to do two cookie sheets full and it is so good!  I just layered the pretzels and liberally drizzled the chocolate over. 

We like the sweet/salty combo and this way is a little more salty than sweet.  I will be packaging them up for my first grader's specials teachers to get them out of my house! I used Pretzel Crisps but regular pretzels would work just great. I got a huge bag of the thins at Sam's Club really cheap.  I probably used half a bag, which is equivalent to almost two small bags you'd buy at the grocery store.

Peppermint White Chocolate Pretzel Bark

12-14 oz Pretzel Crisps, or use regular pretzels
1/2 block of white almond bark or candy coat
1/3-1/2 c. crushed starlight mints or candy canes
parchment paper

Line two cookie sheets with parchment paper.  Spread a thin layer of pretzels over the cookie sheet.  They can be overlapping a little bit.  Follow the directions on your bark to melt.  Using a butter knife generously drizzle the pretzels with the melted chocolate, making sure to overlap.  How heavily/lightly you drizzle the chocolate will depend on how much you like.  Before letting it set sprinkle crushed peppermints over the top.  Let set and break apart.  Enjoy.  (These will stay fresh in a ziploc or airtight container up to a week.)


post signature

12/16/12

Beef & Bean Stew


I had a bag of dried northern beans and wanted to use them up so I began my recipe search and found this recipe.  I used it as a basis for this soup and it was so good!  We will make this over and over again, it's easy to put together in the crockpot and is nice to have dinner prep all ready well before the dinner rush.  This recipe is a great way to use up an inexpensive, more tough cut of beef such as a chuck steak or London broil because slow cooking will make it fall apart. 

It is finally crisp in Phoenix, so this is a great recipe to try now!

Beef & Bean Stew (Slow Cooker)
recipe adapted from bhg.com

1 lb dried northern beans (canellini beans)
12 oz. lean beef, cut into 1'' cubes
salt, pepper & 1 tsp. smoked paprika to season the beef
8 oz. bulk Italian sausage (I used fresh chicken sausage)
3 large carrots, peeled and sliced
3 medium onions, coarsely chopped
5 cloves garlic, pressed or minced
6 cups water
4 tsp. instant beef granules or 4 beef boulion cubes
1/2 tsp. dried thyme, crushed
1/2 tsp. dried oregano, crushed
1/2 c. dry red wine (merlot, cabernet, etc.)
1/3 c. tomato paste
fresh parsley, chopped for serving

Soak the beans overnight.  Drain and rinse them and add to a crockpot. Heat a skillet & 1 Tb. olive oil over medium heat, season the beef well with salt, pepper and paprika.  Brown beef on all sides and add to the crockpot. (It isn't necessary to cook the beef completely.) Add the sausage to the skillet and cook completely, adding to the crockpot when finished. Add all other ingredients to the crockpot and stir well.  Cook on low all day or high 4-6 hours.  Stir occasionally throughout the day. Taste and adjust salt & pepper. Sprinkle individual bowls with fresh parsley & serve with crusty French bread.


post signature

12/13/12

Dark Chocolate Mint Truffle Cake Mix Cookies


We had a Christmas party to go to and there was a cookie exchange...so I needed to make 8 dozen cookies.  I don't enjoy baking.  I can bake, but I'm not that great at it and I really don't love it.  I think what I dislike is the mess.  Every time I bake I have to vacuum and clean up a fine flour dusting from everything...and I don't like messes.  So anyway, I wanted to try out a cake mix cookie because I loved the pumpkin cookies so much.  I found this recipe which looked really Christmas-y so I adapted it and it was great!  These cookies are really yummy and I love the gooey mint.  I used the Hershey's mint truffle kisses and chopped them up, but Andes chips would be great.  You can definitely play with this recipe.

I will definitely make these over and over again! AND I baked 8 dozen of them in only a couple hours which is a plus. These cookies would be a great little gift for your neighbors or a teacher.

Dark Chocolate Mint Cake Mix Cookies
recipe adapted from rubyreduction.com

makes 2 dozen cookies

1 box chocolate cake mix (I used Duncan Hines Dark Chocolate Fudge)
2 eggs
1/2 c. oil (I used a little bit less than that)
1 c. chopped Hershey's kisses, your favorite flavor will be great.  I used mint truffle.

The best way to chop the kisses is to unwrap them all and refrigerate at least an hour.  Then chop them up and measure out 1 generous cup. Preheat the oven to 350.  In a large bowl mix together cake mix, eggs & oil with a hand mixer until everything is blended well, no clumps in the mix.  Stir in the chopped kisses.  Roll into balls, about 1-1 1/2 inches, and bake 10 minutes.  Let cool completely.
 

post signature

12/9/12

Peanut Butter Cookie Oreo Brownie Bars


I am kind of obsessed with this recipe.  I found it on Pinterest (shocking) and it is SO good. You actually "need" the ice cream because it's pretty sweet!  The original recipe was for chocolate chip cookie dough on the bottom, but I decided to change it up and do peanut butter cookie dough and we all loved it.  Don't judge, but I used a package of Betty Crocker cookie dough mix for the peanut butter cookie dough and it worked out just perfectly without having to measure out a hundred ingredients...you do whatever you want!  One tube of peanut butter cookie dough or a half batch of your favorite peanut butter cookie mix would work great if you aren't a lazy baker like me.  This would be a great addition to any Christmas party!  I used dark chocolate hot fudge from the store to drizzle on top because I ran out of time to make my own, but this hot fudge from Our Best Bites would be fantastic on top!

Peanut Butter Cookie Oreo Brownie Bars
recipe adapted from kevinandamanda.com

cooking spray or butter for dish
1 package Betty Crocker peanut butter cookie mix, prepared according to directions (oil & eggs needed)
1 package Double Stuff Oreos
1 box brownie mix, prepared according to directions (eggs & oil needed for this also)
1/4 c. hot fudge sauce
vanilla ice cream
additional hot fudge for serving

Preheat the oven to 350.  Spray or butter a 9x13'' pan.  Press the peanut butter cookie dough down into the pan evenly.  Layer on the Oreos.  Stir the 1/4 c. hot fudge sauce into the brownie batter and pour the brownie batter over the top. Cover with foil and bake 30 minutes.  Remove the foil and bake another 15-20 minutes, it will still be a little bit gooey in the middle when done but not seem raw.  Let cool before cutting.  Top with vanilla ice cream and additional hot fudge, if desired.  Enjoy!!

http://pinterest.com/pin/create/button/?url=http%3A%2F%2Fcrackedupkitchen.blogspot.com%2F2012%2F12%2Fpeanut-butter-cookie-oreo-brownie-bars.html&media=http%3A%2F%2F3.bp.blogspot.com%2F-NpqaAVgwXN4%2FUMSu8QvqCSI%2FAAAAAAAAAW8%2FdXVW7ZUE-PU%2Fs1600%2Fsexy%2Bbrownies.JPG&description=Cracked%20Up%20Kitchen%3A%20Peanut%20Butter%20Cookie%20Oreo%20Brownie%20Bars


post signature

12/4/12

Pinspiration: Displaying Christmas Cards


We have a lot of family and get lots of Christmas cards, which I love! Every single year I am looking for a way to display my Christmas cards.  I have tried at least six different ways to display them and never was in love with any of them.  Somewhere during the last year I pinned this idea and miraculously....I remembered to look at my "Christmas" pin board this November!  I am loving this way to show my cards.  So very simple, not expensive and can add some color or decor to even the simplest holiday decor in a few minutes.  Thank you to Budget Wise Home for the great idea!

Supplies Needed:

  • ribbon
  • scissors
  • tape
  • mini clothespins
Here's what to do:


  1.  Measure your cupboards so you know how much ribbon you need.  You need a little extra to fold over the tops and bottoms so don't forget to account for that.
  2. Choose a ribbon, I would suggest something a little wider and not sheer so that it will hold more weight.  I got this finished burlap which is also used as garland on my tree so it all ties in.
  3. Cut the ribbon to the length you need. Don't forget to account for the extra needed to go over the tops and bottoms of the cupboard doors or you'll be sad.
  4. Attach the ribbon with tape at the top of the inside of the cabinet door.  Then tear off a shorter piece of tape and roll it up and stick it on the back of the middle piece of ribbon on the front of the door for extra hold. Lastly attach the ribbon with tape at the bottom of the inside of the cabinet door. Note: I started out with packing tape and then I ran out, so I ended up with duct tape which is a little stronger but I can't guarantee I won't be scrubbing the ductape residue off with googone after Christmas!
  5. Clip your cards on the ribbon with tiny clothespins & enjoy them!

http://pinterest.com/pin/create/button/?url=http%3A%2F%2Fwww.crackedupkitchen.blogspot.com%2F&media=http%3A%2F%2F4.bp.blogspot.com%2F-D6aET8r0dms%2FUL5qZapRoiI%2FAAAAAAAAAWE%2F-onAYKYcgVM%2Fs1600%2Fchrist%2Bcards%2Bribbon.JPG&description=Cracked%20Up%20Kitchen%3A%20Christmas%20Card%20Display
post signature

12/2/12

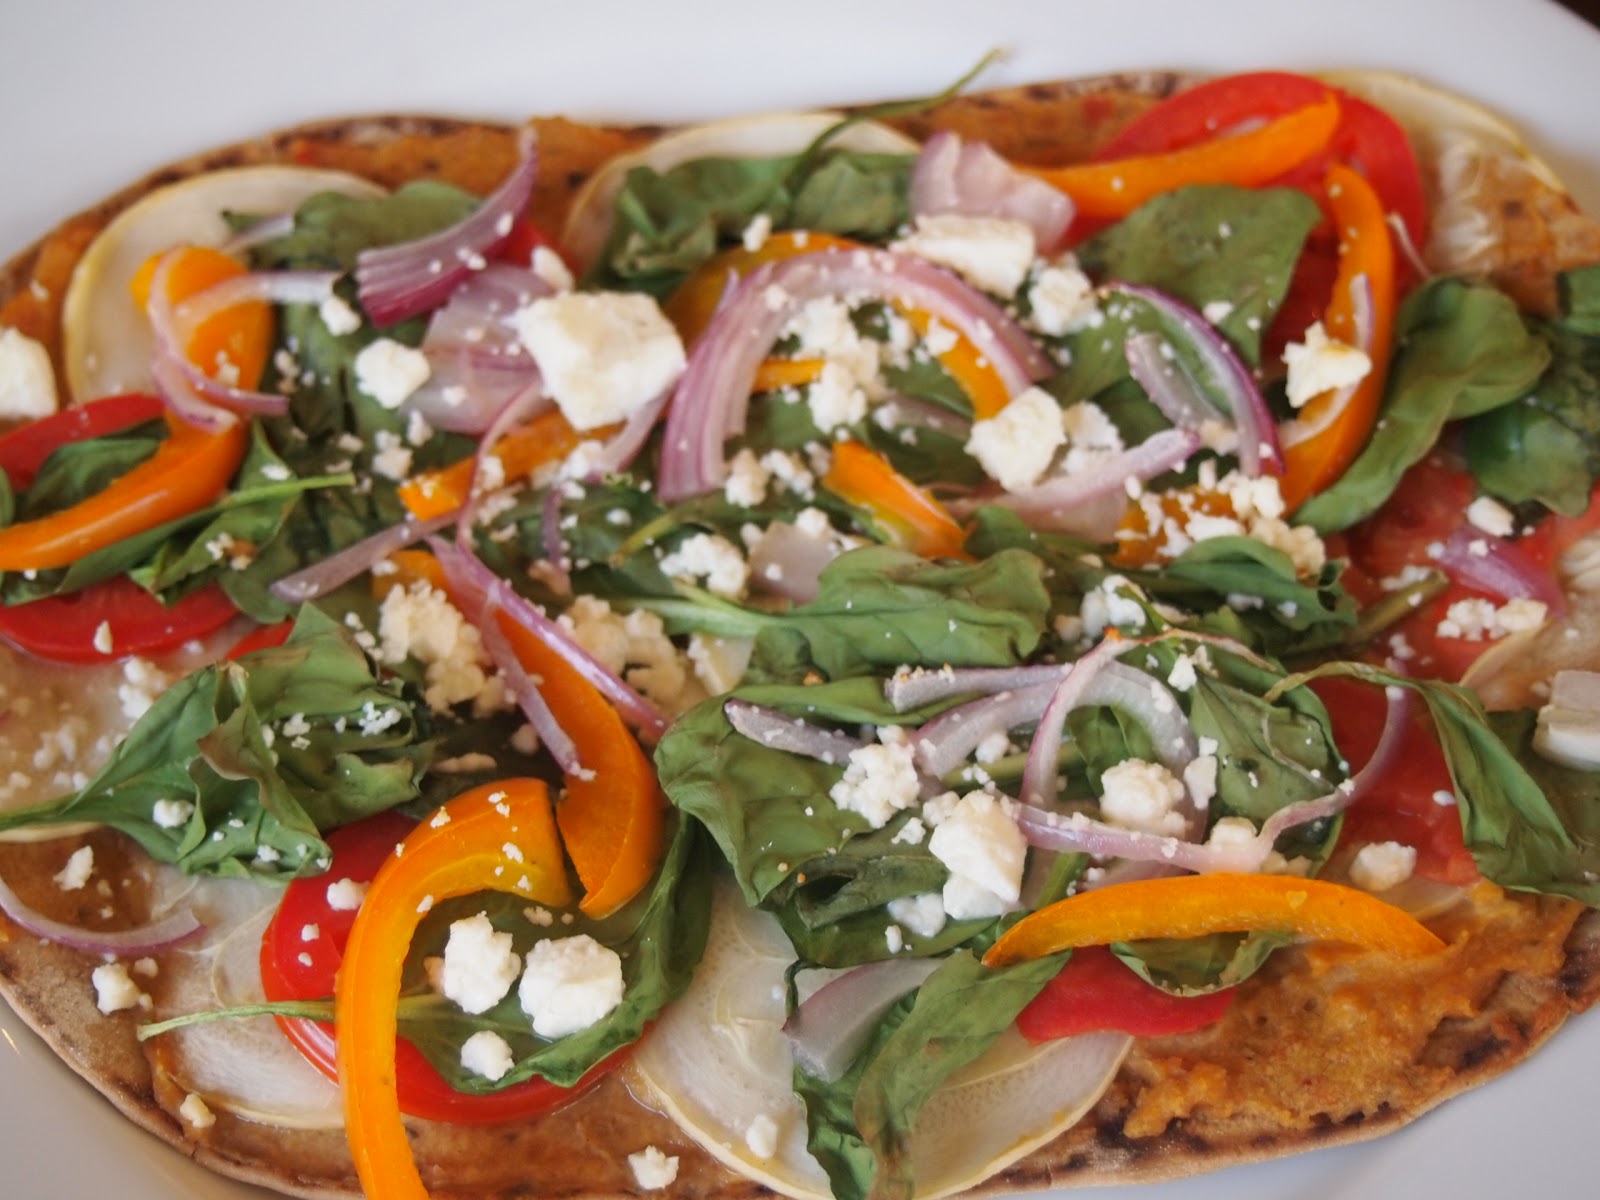
Roasted Veggie Flatbread


This is my go-to lunch lately and sometimes dinner. What can I say, I get in a rut.  This is very similar to the Greek hummus pizza, just less cheese and no making crust so you can actually throw it together in a couple minutes and just bake while you put your kids down for a nap.  Or whatever you do at your house in 10 minutes.  This is the perfect use for the roasted garlic hummus, but store bought hummus is great on it also.  If you're eating vegan just skip the feta.  But...the feta is really good on here so I pretty much never skip it.  Any veggie would be great on this so go for whatever you have/like.

Roasted Veggie Flatbread

1 flatbread, wrap or tortilla ( I use Flat Out wraps)
2 Tb. Hummus
Zuchinni or yellow squash, very thinly sliced 
Tomato, thinly sliced
Spinach (Just enough to cover the wrap)
Bell pepper, any color, thinly sliced
Red onion, thinly sliced
2-3 Tb feta, crumbled

Preheat the oven to 425.  Spray a piece of foil with cooking spray and lay the wrap or tortilla on it.  Spread the hummus all over the wrap.  Layer the squash, tomato, spinach, bell pepper and onion.  Sprinkle on the feta and bake for 10-12 minutes.  
 
 
post signature