Showing posts with label DIY. Show all posts

5/5/13

Teacher Appreciation Ideas


Teacher Appreciation week starts tomorrow, May 6th.  After being a teacher I really appreciate and understand all that teachers do, so I like to send in something every day for the week.  If you're thinking every single day is overkill, just pick one small way to show your kids' teachers that you appreciate them.

I tried to find things that were cute and practical, but not too expensive, being as my little kids have two preschool teachers each (times three days/week is six gifts there), plus my son's first grade teacher, and I wanted to send something in for all of the specials teachers at the elementary school too. So, that's a lot of gifts! Whew! Got it all figured out, all the supplies bought and most of the work done, so I'm feeling prepared.  If you haven't even given it a thought yet, here's a few ideas to get you started, that don't take a ton of time or extra special skills! (Ms. Sons, if you're reading this...stop now! Don't want to ruin the surprise.)

One day I am going to bring in lunch for the whole first grade team. I brought lunch for the kindergarten teachers last year too and I try to choose something that can be eaten cold, so that I'm not trying to time the cooking and delivery of the lunch perfectly OR the teachers don't have to spend their precious lunch time fighting for microwave space in the break room.  This year I made the teachers Southwest Chicken Pasta Salad, fresh fruit and brownies with peanut butter frosting.


I found this great subway art download through Pinterest.  I uploaded the image to Sam's Club and printed it on a 5x7. Then I used Mod Podge and a foam brush to attach scrap paper and the subway art to the back of a clipboard and covered with a few coats of Mod Podge.  For the front I had the little kids (ages 2 and 4) color and sign a note that I typed up.  My first grader wrote his own note. This subway art would look super cute as an 8x10 or 11x14 in a frame too.

Another gift I made is a monogram "wreath".  I found some cute letters at Hobby Lobby.  They're just MDF that I sanded on the edges, made some rolled fabric flowers and attached a ribbon to.  My daughter has a male preschool teacher that we love, but I didn't think Mr. Ty would be in love with a rolled fabric flower "wreath" so I'm in the process of painting his letter with chalkboard paint, thinking that's a little more masculine.


Hobby Lobby had these cute little popcorn boxes that I just loved so I'm going to make a couple batches of double chocolate peanut caramel corn to stuff in the boxes, package it in a celophane bag with a ribbon and tie some tags on. (I typed up these little tags, that I have yet to cut and attach to black cardstock.) I'll add a picture of the finished product! The caramel corn boxes will also be the treats for the specials teachers.


And, I'm going to bring in a latte or sonic drink for the last day.  After a hot day (week) teaching first graders, who wouldn't love a cold treat?


post signature

12/4/12

Pinspiration: Displaying Christmas Cards


We have a lot of family and get lots of Christmas cards, which I love! Every single year I am looking for a way to display my Christmas cards.  I have tried at least six different ways to display them and never was in love with any of them.  Somewhere during the last year I pinned this idea and miraculously....I remembered to look at my "Christmas" pin board this November!  I am loving this way to show my cards.  So very simple, not expensive and can add some color or decor to even the simplest holiday decor in a few minutes.  Thank you to Budget Wise Home for the great idea!

Supplies Needed:

  • ribbon
  • scissors
  • tape
  • mini clothespins
Here's what to do:


  1.  Measure your cupboards so you know how much ribbon you need.  You need a little extra to fold over the tops and bottoms so don't forget to account for that.
  2. Choose a ribbon, I would suggest something a little wider and not sheer so that it will hold more weight.  I got this finished burlap which is also used as garland on my tree so it all ties in.
  3. Cut the ribbon to the length you need. Don't forget to account for the extra needed to go over the tops and bottoms of the cupboard doors or you'll be sad.
  4. Attach the ribbon with tape at the top of the inside of the cabinet door.  Then tear off a shorter piece of tape and roll it up and stick it on the back of the middle piece of ribbon on the front of the door for extra hold. Lastly attach the ribbon with tape at the bottom of the inside of the cabinet door. Note: I started out with packing tape and then I ran out, so I ended up with duct tape which is a little stronger but I can't guarantee I won't be scrubbing the ductape residue off with googone after Christmas!
  5. Clip your cards on the ribbon with tiny clothespins & enjoy them!

http://pinterest.com/pin/create/button/?url=http%3A%2F%2Fwww.crackedupkitchen.blogspot.com%2F&media=http%3A%2F%2F4.bp.blogspot.com%2F-D6aET8r0dms%2FUL5qZapRoiI%2FAAAAAAAAAWE%2F-onAYKYcgVM%2Fs1600%2Fchrist%2Bcards%2Bribbon.JPG&description=Cracked%20Up%20Kitchen%3A%20Christmas%20Card%20Display
post signature

11/11/12

Pinspiration: Burlap Wreath


 I can't explain why, but I am so in love with burlap.  I just want it to be everywhere! Last fall I was investigating making my own fall wreath and I fell in love with this bubble burlap wreath on Pinterest.  My friend and I went and bought the necessary supplies.  Later, I cut the burlap into strips and then into small squares, creating a gigantic mess all over everything, vacuumed for half an hour, and then attempted to pin the bubbles.  I got confused and then gave up.  (My friend's bubble wreath turned out perfectly, so we know it is possible!)


Then, I decided to find something simpler.  So I found this tutorial for the ruffled burlap wreath.  Looked super simple, so I went out armed with my Michael's, JoAnn and Hobby Lobby coupons, bought all of the supplies for this wreath, stuffed it into my junk cupboard and never followed through.  Sigh.  Sounds like the opposite of a high-functioning frugal girl, huh? Well....September 2012 rolled around and I was NOT going to let fall go by again with these wreath supplies lying around.  I made the ruffled wreath one afternoon and it was not difficult at all.  Keep in mind that I have never successfully sewed a button on or mended a hole in a garment, so the ruffling must be easy.

After reading a few tutorials on making fabric flowers--here and here, I made a couple flowers out of a scrap of fabric and an old sweater with a hole in it.  Then I painted the "L" with some leftover house paint and found that cute denim flower for $2 in the scrapbooking department at Hobby Lobby, overall coupons included I spent approximately $11 on the wreath.  Not too shabby for something I can use several years!

My sister really liked the wreath and wanted to make her own, but hadn't gotten to it, so for her birthday I made the wreath below for her.  She had mentioned she wanted something even simpler than the ruffle wreath, and she loved the final product.

For the wreath below the supplies needed are:

  • Straw or foam wreath, this straw one was probably 18'' diameter
  • 3/4 yard of burlap, cut into 2 1/2 inch strips
  • hot glue gun & glue sticks
  • pins
  • fabric flowers--I used 1/8th yard of the brown patterned fabric, 1/8th yard of the cream colored fabric, a leftover strip of brown burlap, & and a few pieces of denim from an old holey pair of jeans
  • a cardboard star ornament ($.68 at Hobby Lobby)
  • any other embellishments you'd like: wooden cutout shape or letter, etc.
  • ribbon of your choice to wrap for attachment to a hook or holder.
Steps to make the wreath:

  1. Wrap the wreath with strips of burlap or other fabric, hot gluing on the back as you go.  Once the entire wreath is covered go back and add some pins over the back of the wreath to keep the fabric even more securely in place.
  2. Make your rolled fabric flowers or fabric roses (I take no credit for these ideas, these tutorials helped me greatly!)
  3. Lay your flowers, embellishments, wooden cutouts, etc. on the wreath to see where you want them.  Glue or pin to secure your flowers.
  4. Wrap a piece of ribbon around the wreath and tie to make the hook/holder attachment.  This part is great because it's easy to exchange out ribbons to bring out different colors.
Cost of the wrapped burlap wreath:
$3 for the actual straw wreath (used my 50% off Michael's coupon)
$4 for burlap from Walmart
$1.75 for cream colored fabric from Walmart
$.69 for the brown fabric @ Hobby Lobby (sale that week)
$.69 for the cardboard star ornament
$1.00 in glue sticks (I used a lot of glue sticks on this!)

10/28/12

Mad Scientist and Other Inexpensive Halloween Costumes


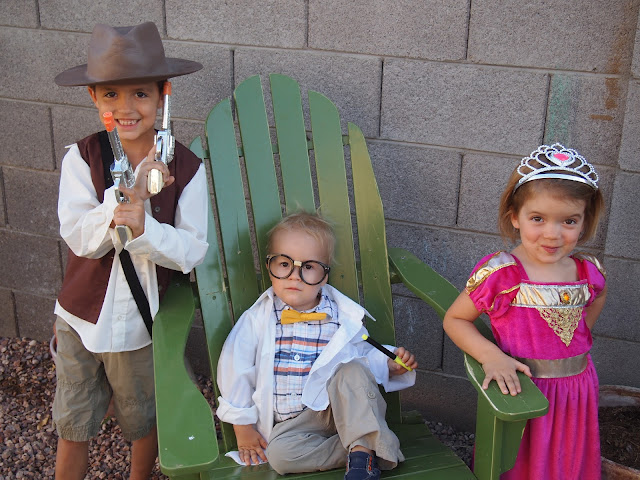
We are attempting to stick to our budget, live within our means and not spend money on unneccesary things so that we can hopefully send our children to college and be more generous.  One way we cut down is by not buying Halloween costumes this year.  I know that sounds nutty, but we were able to borrow or make everything by using stuff we already had and it was actually kind of fun.  Well, fun for me, I guess we could ask  my mom how fun it was since she was the one who sewed my oldests Indiana Jones vest.  My oldest son's school had a Fall Festival last week so we got to dress up early.

Here we have:
Indiana Jones-- We borrowed the hat, whip and satchel from a friend whose son was Indie last year. Although if you needed to buy it, the whip and satchel are super cheap on Amazon with 2-day shipping available. Grammy made the vest with brown fabric I bought for $3.00 so total out of pocket was $3.00 for this! (I told him he couldn't take the whip to school so he traded it out for two guns...which he also didn't get to take to school.)


A Princess--She's wearing a dress-up dress that has seen better days, but I forgot to get her borrowed Snow White costume before the Fall Festival! Total spent on this is $1.00 at the dollar store for a crown. On Halloween she will be Snow White and I did buy some red ribbon for her hair so total on her costume(s)--$2.00 (with leftover ribbon for another project.)


Mad Scientist-- This is my favorite!  I got this idea from my friend after she hosted an unreal Mad Scientist Birthday Party for her son, complete with science experiments, lab coats and goggles, and a petri dish filled with gummy worms as a party favor.  I figured I could make my youngest play this part because we joke that his hair looks like Einstein's.  It worked out great.  I borrowed the bow tie from my sister, he wore a shirt and pants he already had, and I purchased the glasses from the Dollar Store and the boys size 6 shirt (lab coat) from the Goodwill 50% off sale for $1.50 so total spent on this costume was $2.50. 

Total Spent for three Halloween Costumes: $7.50...not too shabby!  As for the cost of a Halloween Block Party complete with a nacho bar and apple cider.....a little more than that but we love doing it!!

http://pinterest.com/pin/create/button/?url=http%3A%2F%2Fcrackedupkitchen.blogspot.com%2F2012%2F10%2Fmad-scientist-and-other-inexpensive.html&media=http%3A%2F%2F4.bp.blogspot.com%2F-SNh-3ZevSDQ%2FUI3YBEVfBuI%2FAAAAAAAAAMA%2FZSWZcS_d4gU%2Fs1600%2FP1010770.JPG&description=Inexpensive%20Halloween%20Costumes%3A%20Mad%20Scientist
post signature