Showing posts with label quick prep. Show all posts

6/12/13

Shredded Pork Tacos with Charred Pineapple Salsa


I made these tacos for dinner tonight, I love this meal because it took five minutes to get the pork into the crockpot, 10 minutes hands-on time to make the salsa, and dinner was ready!  Each of my three kids ate thirds of this meal, which was pretty amazing! I will make this over and over again.

Shredded Pork Tacos with Charred Pineapple Salsa

2-3 lb pork loin roast
5 garlic cloves, minced or pressed
1 tsp. cumin
1 tsp. sea salt
2 tsp. chili powder
1/2 lime, juiced
1 Tb. canola oil
3/4 c. water

For Serving:
corn tortillas
lime wedges
sour cream

In a small bowl mix together garlic, cumin, sea salt, chili powder, lime juice and oil.  Cover the pork roast with all of the rub and put in the bottom of the crockpot and pour in the water.  Cover the crockpot and cook on low 5-6 hours, shred the pork and mix together well before assembling tacos. To serve put some shredded pork on a warmed corn tortilla and top with sour cream and pineapple salsa.  Serve with a lime wedge.

post signature

6/9/13

Apple Cranberry Chicken Salad


I've posted this recipe before, but the photos were not great terrible. And I realized that the recipe wasn't super precise because when I cook I typically throw a bunch of stuff together until it works out.  This time, I very precisely measured everything!  And I think my photography has improved as well...just a bit.

I like to use baked bone-in chicken breasts or rotisserie chicken for my chicken salad, but you can certainly boil your chicken or used canned if you prefer the ease of that.  For these photos I used rotisserie chicken.  The photo above is my "sandwich", the photo below is my skinny husbands sandwich. Tastes great either way! I also like to set it out with some wheat thins or other crackers at a party.


Apple Cranberry Chicken Salad

4 c. chopped, cooked chicken
3 green onions, chopped
1 medium granny smith apple, peeled and chopped small
1/4-1/3 c. dried cranberries, depending on how much you like.  (I used 1/4 c.)
1 large celery stalk, chopped
1 heaping Tb. spicy brown mustard
1/3 c. sour cream or Greek yogurt
1/3 c. mayo
salt & pepper to taste

lettuce, sliced tomatoes, bread and/or crackers for serving.

Mix all ingredients together, taste and adjust salt and pepper to your liking.  (You can certainly sub seasoned salt, but I like the simplicity of just salt and pepper.) Refrigerate at least one hour before serving.

* Note: I have noticed that the Greek yogurt leaves the salad a little bit watery whereas the sour cream thickens it more.  I still use the Greek yogurt :)
post signature

6/1/13

Creamy Southwest Chicken

I seem to have been experiencing Blogger's-block.  If that exists.

Every time I use Blogger, my computer crashes and my husband has to re-install the operating system.  I'm sure it has nothing to do with Blogger itself, but rather that my laptop has some kind of nasty virus that can't be completely undone.  Basically my laptop has spent a lot of quality time as a paper weight lately.  And then once he had it all up and running again, I was out of the Blogging-routine and in the middle of May-sanity (ie: end-of-the-schoolyear-over-commitment).  May-Sanity is over now so I thought I would give it another whirl.

Today I'm bringing you a recipe we really like that is great for summer in HellonEarth the desert because it is all cooked in the crockpot with very little prep!  AND it makes a lot so it's great for a few lunches too.


I found this recipe on ...yah, you guessed it--Pinterest.  Shocking.  I am currently making an attempt to go through my Pinterest account and either make the recipes or crafts I've pinned or get rid of them.  I did adapt this recipe quite a bit to make it more flavorful for us but the base is great!  We like this in whole wheat tortillas, on chips or over rice or quinoa.

Creamy Southwest Chicken
recipe adapted from The Larson Lingo

2 lbs boneless, skinless chicken breasts (frozen is fine)
1 8-oz block cream cheese
1 can black beans, drained and rinsed
1 can pinto beans, drained and rinsed
1 can Rotel, not drained
2 c. frozen corn kernels (I prefer Trader Joe's super sweet frozen corn)
1 packet taco seasoning mix
2 cloves garlic, minced or pressed
dash of cayenne pepper
Tortillas, tortilla chips or cooked rice for serving

Toppings:
diced red onion
jalapeno slices
shredded cheddar cheese
hot sauce, taco sauce or salsa

Place the chicken in the bottom of a slow cooker.  Put the block of cream cheese, beans, rotel and corn on top of the chicken and sprinkle the taco seasoning, garlic and cayenne pepper on top of everything.  Cook on low 5-6 hours.  When you're ready to eat stir it well and shred the chicken.  Let the crockpot stand without the lid on for 10-15 minutes before serving and the mixture will thicken up a bit.  Serve as nachos or in a burrito with desired toppings.
post signature

4/29/13

Meal Prep Can Save You!


You know that saying, "Failure to plan is planning to fail."? Yah, well as cheesy as it is, it is TRUE! Especially when you're trying to eat healthy and lose weight or maintain a healthy weight.  I've mentioned before that I've struggled with  my weight and I have my whole life. Starting in third grade I became the fat kid and the struggle continues! After having three children I have finally learned that I can never just eat whatever I want.  I just can't. I've decided to be okay with that.  Someone told me I should write some tips out to help other people, so that's what this post is all about. 

My normal is to eat as healthy as possible, lots of fresh veggies and fruit and tons of water throughout the week, along with a good hour-long cardio and weights session or class at least four times a week.  On the weekends I loosen up on my diet a little bit and give myself a meal or two off to eat the food that I love, but that I know isn't helping my waistline! (Pasta, pizza, burgers, etc.) I can't just take the whole weekend off and make it a hayday. Disappointing, but true. Honestly, when I have done that I just feel so terrible I can't enjoy it anyway.

Prepping my healthy food ahead of time helps so much. If I have to chop lettuce and wash it, dry it and chop all of my veggies just to make a salad at lunch time when I've worked out and am already hungry, it is really tempting to eat something else! (AKA leftover pizza from said weekend splurge.)

Every Monday morning I chop all of the veggies I plan to use in my egg whites for the week.  The photo above is a small yellow onion, a small head of broccoli, and a bunch of spinach.  I washed all of it and chopped it small to use in my eggs.  That way in the morning when we are rushing to get out the door and to school on time I am not tempted to eat carbs instead of egg whites, which I know will fill me up and keep me full.  (Some other veggies I like to use in my eggs are zucchini or yellow squash, bell pepper, asparagus,  mushrooms...)

At the beginning of the week I also make a big salad that I can eat off of for lunch.  If it's in the fridge then I'm prepared. If I know that I'm going to be running errands after bible study and won't make it home for lunch I can quickly pack myself a salad, some carrots, and hummus and I am not tempted to drive through fast food to eat something that I will really regret!  I have found that I do not make rational food decisions when I feel hungry. I'll also pack myself a snack like a Lara bar and an apple if I know that I'm going to run some errands after a workout.  Too many times I have spoiled the hard work I've done at the gym on popcorn at Target or a frappuccino because I'm so hungry I don't care!


A typical day of eating for me:
Breakfast: sauteed veggies with 4 egg whites and iced coffee with cream
Snack: apple, orange, Lara or Luna bar, EAS shake, or slice of turkey (it all depends on my activity)
Lunch: salad with grilled chicken and vinaigrette OR flat out wrap with veggies and turkey OR leftovers (depending on what we had for dinner the night before)
Snack: baby carrots, cucumber & bell pepper slices with hummus
Dinner: healthy homemade meal...the options here are endless!
Snack: I usually have something after dinner, fresh fruit or an apple with peanut butter are my "good choices".

With just a small amount of prep it takes almost no time to throw together a healthy, filling meal or snack when I am rushed.  Without the prep I find that I eat whatever I can get my hands on when I'm "starving" and then my skinny jeans pay the price!
post signature

3/27/13

Hummus Crusted Chicken


I found this recipe on Pinterest...as usual. It was a good, very quick and simple recipe.  AND a new and more interesting way to eat chicken breasts, which is always a plus! 

Hummus Crusted Chicken
recipe adapted from Gimme Some Oven

4 boneless chicken breasts
salt & pepper
granulated garlic
1 cup hummus, any kind you like.  Or make your own!
1 lemon
smoked paprika

Preheat the oven to 450.  Spray a 9x13 pan with cooking spray and lay the chicken down.  Sprinkle generously with salt, pepper and granulated garlic.  Cover each piece of chicken with a generous coating of hummus.  Sprinkle the top with smoked paprika and squeeze the lemon over the top.  Bake 20-30 minutes, checking to make sure the chicken is cooked through.  This was great served with garlic, rosemary & olive oil quinoa and roasted veggies.

post signature

3/13/13

Iced Coffee, the Easy At-Home way!


We love coffee.  Actually, we are kind of snobs about our coffee.  There's  no Folgers up in here.  HAS to be Starbucks, Seattle's Best, Tully's or Peet's coffee...sometimes Gevalia if it's on sale and I have a coupon.  I know, I know, "Dunkin' Donuts won in the blind taste test against Starbucks." BUT I could blind taste test tell you which one was Dunkin' Donuts...not a fan (their donuts...another story).  As soon as it gets warm-ish, which is right now for Phoenicians, we go straight to iced coffee for the duration of the summer.  I just can't drink hot coffee when it's hot out.  But I also can't live without coffee...so it's been a problem.

We have tried so many ways to make iced coffee in bulk so I'm not brewing coffee in the morning and freezing it for an hour so it's cold so I can add ice to it so it isn't watered down.  Because we are picky about our coffee, I can't do the "I made regular coffee yesterday and after several hours put the leftover in the fridge so now I'll make an iced coffee out of it" version.  It doesn't taste right,  and we can't have that.  Then, I found it.  The perfect iced coffee recipe that is: delicious AND can be made frugally AND lasts a long time in the fridge!

Of course, Pioneer Woman led me to the right way of doing things.  Once again.  I thought it couldn't really work and I'd be sad when my coffee flunked, but when my Aunt Michelle came last summer she and my cousin made the first batch...and-- It. Works.  I adapted Pioneer Woman's method ever so slightly just because I'm cheap and didn't want to fork over loads of cash for a food service container and cheese cloth (whatever that is) and a beautiful drink dispenser that would never fit in my normal-sized fridge.  Two gallons of this coffee costs $6 or less, depending on the type of coffee you choose. Add in the cost of your own coffee syrup and half and half, and you just CAN'T beat it.

All you have to do is buy an inexpensive Rubbermaid container that will hold 2 gallons of liquid.  I got mine at Walmart for less than $5.00.  Stir one 12-16 oz bag of strong coffee (sometimes I used espresso blend) into 2 gallons of cold water.  Let it sit 24-48 hours.  The longer, the stronger.  We like it strong!


Then, set a mesh strainer on top of a clean soup pot, layer napkins in both directions and slowly pour the coffee over the strainer.


Iced Coffee
recipe from Pioneer Woman

a 2-gallon container with a lid
2 gallons water
1 12-16 oz bag strong, high-quality coffee (If you like DD, go for it.)
mesh strainer
paper towels

half and half
coffee syrup, sugar, sweetened condensed milk, cinnamon, whatever you like in it

Rinse out your container and fill with 2 gallons of cold water.  Stir in the coffee thoroughly, making sure it is all soaked.  Cover tightly and let sit on your kitchen counter for 24-36 hours.  I usually use a 12 oz bag of coffee so I let it sit 36-48 hours. When you're ready to strain the coffee, place the strainer over a large pot or container and line the strainer with paper towels.  Slowly pour the coffee over the strainer and let the grounds collect.  Discard the coffee grounds and pour the strained coffee into dispensers or pitchers to store in the fridge.  I use a glass iced-tea jar with a spout to store mine.

To make a glass of iced coffee, fill a glass with ice (we buy the ice from the store because it stays cold longer!), pour the coffee over and prepare as you like with half and half, vanilla syrup, sugar...or sweetened condensed milk!  My favorite "Saturday coffee" is a glass of iced coffee with a couple tablespoons of sweetened condensed milk, a splash of half and half and cinnamon.



post signature

3/7/13

Garlic, Rosemary & Olive Oil Quinoa


This photo isn't a great one of just the quinoa, but I just threw the side dish together, not thinking it would be super tasty...but it was. So when Rob insisted that I blog the "recipe" I had to make it again and take notes, this is such an easy, quick side dish that would go with lots of dinners.  I served it with Hummus Crusted Chicken, which I will blog later, and it was a yummy, healthy meal!

On a side note, I buy my quinoa at Costco in a big bag and it's much cheaper than at the health food store...in case you were wondering.

Garlic, Rosemary & Olive Oil Quinoa

1 c. quinoa
2 c. water
2 Tb. olive oil
2 heaping Tb minced onion (red, yellow or white onion, or shallot)
3 cloves garlic, minced or pressed
3/4 tsp. dried rosemary
salt & pepper to taste

Combine the quinoa and water in a sauce pan and cover. Heat on medium-high heat until it starts to boil, turn heat to medium-low and cook for 15 minutes.  In the meantime, heat the olive oil over medium-low heat in a skillet.  Cook the minced onion 2-3 minutes and stir in garlic and rosemary heating another minute.  Turn the heat off and let the oil sit until the quinoa is cooked.  Once the quinoa is done, fluff with a fork and pour in the olive oil mixture.  Serve right away.

post signature

2/18/13

Green Goddess Vinaigrette


This dressing is so delicious.  Seriously, it's our new favorite.  My mom made this recipe up and when she wrote it down for me and I looked at the recipe, it looked weird so I stuck it in the cupboard and forgot about it.  Then, I was at my mom's house and ate the dressing...and that was it.  It.  Is. So. Good. It's all natural, no chemicals like you might find in some grocery store dressings...and it isn't $6 for a bottle!  Win, win.


When you're looking for tahini, might I suggest you avoid purchasing the orange and white can of tahini?  It isn't very good.  At all.  But there are many brands out there in jars that taste awesome and my favorite is the one sold at World Market...and it's a good price.

Green Goddess Vinaigrette
recipe from my mom

1/2 c. apple cider vinegar
1-2 tsp. sugar
3 Tb. soy sauce
1/4 c. fresh parsley
1-2 green onions, chopped
2 Tb.(heaping) tahini
1-2 cloves garlic, roughly chopped 
1 1/2 c. vegetable oil
pepper (no salt because the soy sauce is so salty)
Put everything in the blender and blend until parsley, onions, and garlic is pureed and everything is incorporated.  Refrigerate up to 10 days.
post signature


2/15/13

Cheese Danish


Since I've had a sweets week, I thought I'd end it off with some more sweets.  My family and I adore this recipe, it is super simple to make and kinda impressive at a brunch or morning meeting. It is absolutely not too late to wake up and have homemade cheese danish for breakfast tomorrow! 

Cheese Danish 

2 blocks cream cheese, softened
1 c. sugar
1 egg, beaten
1 tsp. vanilla
2 cans crescent rolls

1/2 c. powdered sugar 
2-3 Tb milk
dash vanilla extract

Preheat the oven to 350. Spray a 9x13 pan with cooking spray. Using a hand mixer blend together the cream cheese, sugar, egg and vanilla.  Open a can of the crescent rolls and lay them on the bottom of the 9x13 pan, pinching the seas together.  Pour the cream cheese mixture over the crescent layer.  Open the second can of crescents and lay it over the cream cheese layer.  Bake uncovered 40-45 minutes, crescent rolls should be golden brown.  Let the danish cool 20 minutes before spreading the glaze over the top.  To make the glaze whisk together powdered sugar, milk and vanilla and spread over danish.  Enjoy warm, room temperature, or my favorite, cold!


post signature

2/13/13

Dipped Pretzel Rods, Homemade Valentine's Treats


Here is a quick, last-minute homemade Valentine's Day treat for you.  I used to be a first grade teacher...so I can relate to the zillions of lollipops, conversation hearts, and Pixy Sticks teachers all over the United States will have piled on their desks tomorrow. I wanted to make something for my kids' teachers that they might enjoy more than a Fun Dip Valentine so I planned to make some Oreo Truffles, because who doesn't love those? But Robbie's teacher has been doing Weight Watchers very successfully and I didn't want to throw her off so I made these.  So. much. easier. than making Oreo Truffles! If you make a quick Wal-Mart run for pretzel rods and pink candy melts you could whip out these cute little treats in 20 minutes!  


Dipped Pretzel Rods
idea from A place for Amy

1 bag pretzel rods
1 bag candy melts, whatever color you like
sprinkles
foil or wax paper

Break the rods in half and set aside.  Put 1/2-3/4 of the candy melts in a glass bowl and melt according too directions.  Put a sheet of foil or wax paper out on the counter. Once the chocolate is melted pour it into a short glass or small coffee cup to make dipping easier.  Dip each pretzel and lay on the wax paper to harden.   Put on the sprinkles as desired.  I wrapped up five dipped pretzel halves in a cellophane bag with a scrap paper tag and some ribbon I had lying around...and easy as can be, done!

post signature

2/12/13

Chocolate Mallow Fondue


Valentine's Day is right around the corner!! Truly truly, I'm not a huge fan of Valentine's.  I think it excludes people, puts extra pressure on loved ones (especially men), and we should really appreciate our loved ones more than one day a year.  That being said, it is what it is and I AM so thankful for my husband so I'm going to tell him especially on this day.  But, this year we are going to focus on our kids and start a tradition to do fondue with them for dinner & dessert (which is an idea I stole from my friend).  Going to a restaurant on Valentine's Day is  not fun.  Not. Fun.

I have made this chocolate mallow fondue so many times, but sadly have never remembered to take a picture, so I will update with a photo later this week!  BUT, if you trust me at all...believe that this is a delicious treat and try it!  I love my fondue pot, but if you don't have a fondue pot, this would work out just fine if you made it in a sauce pan on the stove (medium heat) and poured it into a little dipper crockpot on the warm setting.  This makes a lot, but the leftovers are great and work perfectly as hot fudge!

For dinner, I am going to try this cheese fondue recipe for the first time, so I'll let you know how we like it!  For dipping in the cheese fondue: smoked turkey sausage, steak, french bread, soft pretzels, granny smith apples and red bell peppers.

Chocolate Mallow Fondue
recipe from my friend 

2 c. semi-sweet chocolate chips (12 oz bag)
1 14 oz can sweetened condensed milk
1 7 oz jar marshmallow fluff
1/2 c. milk
1 tsp. vanilla extract

Dippers:
banana
strawberries
apples
raspberries
graham crackers
pretzels
Oreo cookies
cream puffs
rice krispy treats
etc...

Turn your fondue pot onto medium.  Pour in the marshmallow fluff and sweetened condensed milk.  Stir with a rubber spatula constantly until the marshmallow fluff is melted.  Add in chocolate chips, milk and vanilla and stir constantly until everything is melted and incorporated together.  Turn pot to low.  When you're finished, transfer leftovers to a container and refrigerate. This will keep a couple of weeks in the fridge.


post signature

2/11/13

BBQ Chicken Quinoa Salad


We love quinoa.  And we really love bbq chicken, so when I saw this recipe pop up I knew I had to make it! We really liked it and I think you could make different variations of this salad.  A little ranch drizzle would be great too!  We ate it warm, but the next day Rob and I both ate it cold for lunch leftover and it was great both ways.  For a filling, protein-rich, low fat dinner it was a hit! I'm thinking this will go into our regular summer dinner rotation because I always have my eyes out for cold make-ahead summer dinners around here.

BBQ Chicken Quinoa Salad
recipe adapted from Eat Yourself Skinny

1 1/2 c. dry quinoa
3 c. water
dash salt

3 c. shredded cooked chicken 
1 can corn, drained well
1 can black beans, drained well
1/2 red, orange or yellow bell pepper, chopped
1/4 red onion, chopped
3 green onions, sliced
1/3 c. cilantro, chopped
salt & pepper
1/3 c. bbq sauce

Toppings:
chopped cilantro
diced avocado
shredded pepper jack cheese
bbq sauce
ranch dressing

Bring the water to a boil in a large sauce pan.  Stir in quinoa & salt and lower heat to medium-low and cook 15 minutes.  Remove quinoa from heat and fluff with a fork.  Stir quinoa, shredded chicken, corn, beans, bell pepper, onions, cilantro, salt, pepper and bbq sauce together in a large bowl.  Top with extra cilantro, avocado, shredded cheese and a drizzle of bbq sauce and/or ranch dressing. Enjoy!
 
 
post signature

2/5/13

Black Bean Soup with Cilantro Lime Rice


This soup is super yummy, easy and inexpensive to make and just so happens to be vegan...even though you'd never know it!  It has such a great bright punch of lime in with the spicy black beans.  I ate some leftovers for lunch today and it's great leftover.  

If you can't find Cuban black beans, just add in extra seasoning.

Black Bean Soup with Cilantro Lime Rice
recipe adapted from Iowa Girl Eats

Black Bean Soup:
2 tsp oil
1/2 an onion, chopped
3 cloves garlic, minced
3 cans seasoned black beans, drained but not rinsed (I used Trader Joe's Cuban black beans)
1 Tb. chili powder
1 tsp. cumin
1 can rotel
1 c. green enchilada sauce
1 1/2-2 c. water (depending on how thin you want your soup)
1 1/2 c. veggie stock
salt & pepper
Avocado for serving

Heat the oil over medium heat in a soup pot.  Add in the onion and cook until translucent.  Toss in the garlic and stir to cook quickly.  Add in the beans, chili powder, cumin, rotel, enchilada sauce, water, stock, salt & pepper. Bring the soup to a boil, lower the heat and simmer 15 minutes. (Start the rice now.) Once the soup has simmered, remove half of the soup from the pot and blend it until pureed.  Add the pureed soup back to the pot and stir to combine.  To serve, put a scoop off cilantro lime rice in the bottom of a soup bowl and cover with a ladle or two of soup.  Top with avocado slices.

Cilantro Lime Rice:

1 1/2 c. white rice
3 c. water
1 Tb. butter or margarine
1/2 bunch of cilantro, chopped
1 juicy lime

While the soup is simmering, bring the water to a boil in a medium sauce pan and stir in the rice.  Cover, turn heat to low and cook for 15 minutes.  Remove from the heat and let the rice stand a few minutes. Fluff the rice with a fork and stir in margarine, cilantro and squeeze the lime juice in.  Toss to combine.
 
post signature

1/30/13

Mexican Style Pinto Beans


I have lots of bean recipes.  You what they say about the whole "musical fruit" thing...I guess we go for it because we eat lots of beans.  I love, love, love the typical refried beans and I usually make those, but my sister made these beans and we all loved them.  I made a double batch of this recipe to take to our small group nacho bar potluck and didn't have many leftovers!  What was leftover my kids ate with a spoon for lunch today.

These ranch beans are perfect wrapped in a tortilla, dipped with tortilla chips or in chili.

Mexican Style Pinto Beans
adapted from sparkpeople.com

1 lb dried pinto beans, or 2 c. dried beans
3 Tb. cumin
1/2 tsp. crushed red pepper
3 tsp. smoked paprika
3 tsp. granulated garlic
2 Tb. chili powder
1 Tb. salt
1 large onion, chopped
1 bell pepper, chopped (any color)
4 cloves garlic, minced
1 can Rotel, undrained
1 14 oz can crushed tomatoes
3-4 c. water (or more if you don't soak the beans head of time)
1 bunch cilantro, chopped

Rinse the beans and cover them with water and soak overnight.  If you don't have time to soak the beans, just add more cooking time in the morning and 1-2 c. more water.  Rinse the soaked beans and add to your slow cooker.  Measure all dry seasonings, add to the slow cooker, and stir the beans to coat.  Add in the onion, bell pepper, garlic, rotel, tomatoes and water, and stir.  (You want enough liquid to cover the beans.)  Cook on low 4-6 hours, adjusting salt or seasonings as you like.  Stir in the cilantro once the beans are cooked. You can keep the beans on warm as long as you need before serving.  
 
post signature

1/21/13

Vegan Red Beans and Rice


I'm posting this recipe just to show you all how simple it can be to make food you already like vegetarian or even vegan.  Now, I still insist that I have no intentions of becoming a vegan but I do believe that eating fewer animal products could do everyone a little good.  So, this recipe has so been done before, but we really, really love this meal (I probably make it every other week),  it freezes well (minus the rice) and is very inexpensive, easy and flavorful.  All that to say there isn't anything eye-opening about this but it's easy.  When I'm making something like this I up the seasonings a little bit to make up for the sausage that is usually in this meal, which adds flavor and salt.

On a side note, the best vegetable base/stock/bouillion I've found is Organic Better Than Bouillion Vegetable Base.  It's so good.  I haven't found it at my regular grocery store but Sprouts has it all the time.


Vegan Red Beans and Rice

1 lb dried small red beans, rinsed (kidney beans are not the same)
6 c. water + 2 Tb vegetable base
1 onion, diced
1 carrot, diced
2 stalks celery, diced
6 cloves garlic, minced
1 1/2 tsp. Tony's or seasoned salt
1 tsp cumin
1 tsp. coriander
1 tsp. oregano
1 tsp. smoked paprika
dash of liquid smoke

For Serving:
cooked rice
4 green onions, sliced
Frank's Red Hot

Put all ingredients in the slow cooker and cook on low 6-8 hours.  Mash the beans some with a fork or a potato masher.  To serve, ladle some beans into a bowl and top with  rice, sprinkle with green onions & serve with Frank's Red Hot.
 
post signature

1/18/13

Chicken Lettuce Wraps Salad


Taking a little break from the vegan recipe posts! We all loved this lettuce wrap recipe, I'm excited to try to make it vegetarian.  I think if I (you) subbed 1/2 a block of tofu chopped for the chicken and doubled or even tripled the mushrooms it would be a great vegetarian/vegan option!  

Turns out that it's kind of a pain to make lettuce wraps for a family of five, and then the dressing is dripping down everyone's arms so...we made it into a salad and loved it! I ate the rest the next day for lunch and had some of the sauce left over for a salad the following day.  I used a packet of lettuce wrap mix for the wrap filling, but I found the sauce recipe here.  So I guess you could call this a semi-homemade Chicken Lettuce Wraps Salad. It's yummy!

Chicken Lettuce Wraps Salad

1 1/2 lb ground chicken (I'm sure turkey would work fine)
8 oz mushrooms, chopped
2/3 c. chopped water chestnuts (I had fresh ones I peeled and chopped but a can works great)
1 bunch green onions, chopped
1 packet lettuce wraps seasoning packet (I used Sun Bird)

1 head iceberg or bibb lettucce
2-4 c. cooked brown or white rice for serving (depending on how much rice you like)

Mix the lettuce wrap packet together as directed and pour over the ground chicken.  Cover and put in the fridge for at least 30 minutes.  Heat a large skillet over medium heat and saute the chicken with the marinade, mushrooms, water chestnuts and green onions for 8-10 minutes or until the chicken is cooked through.  Then it's your choice to assemble lettuce wraps or a salad! To make wraps or salad layer lettuce, rice, chicken mixture and drizzle with sauce.

Lettuce Wrap Sauce
recipe from epicurious

1/4 c. sugar
1/2 c. water
2 Tb. soy sauce
2 Tb. rice vinegar
2 Tb. ketchup
1 Tb. lemon juice
drizzle of sesame oil
1 Tb. dijon or spicy mustard
1 tsp. sriracha (or more if you really like spicy)
2 cloves of garlic

Whisk all ingredients together and refrigerate.

http://pinterest.com/pin/create/button/?url=http%3A%2F%2Fcrackedupkitchen.blogspot.com%2F2013%2F01%2Fchicken-lettuce-wraps-salad.html&media=http%3A%2F%2F4.bp.blogspot.com%2F-U8Q8YlKtFyA%2FUPmLejrCjmI%2FAAAAAAAAAck%2Fbd4Cs8o-dRY%2Fs1600%2Flettuce%2Bwraps%2Bsalad2.JPG&description=Cracked%20Up%20Kitchen%3A%20Chicken%20Lettuce%20Wraps%20Salad
post signature

12/19/12

Peppermint White Chocolate Pretzel Bark


My mom was visiting a few weekends ago and she ran into Trader Joe's for a couple things and came out with a bag of white chocolate peppermint covered pretzels.  They were SO good.  I wanted to make some but I really, really didn't like the idea of individually dipping small pretzels. Honestly I'm kind of lazy and don't do complicated stuff very often.  And, my family can blow through a whole  bag of these in no time flat so it seems like a lot of work to see them disappear so fast.  This way took 10 minutes to do two cookie sheets full and it is so good!  I just layered the pretzels and liberally drizzled the chocolate over. 

We like the sweet/salty combo and this way is a little more salty than sweet.  I will be packaging them up for my first grader's specials teachers to get them out of my house! I used Pretzel Crisps but regular pretzels would work just great. I got a huge bag of the thins at Sam's Club really cheap.  I probably used half a bag, which is equivalent to almost two small bags you'd buy at the grocery store.

Peppermint White Chocolate Pretzel Bark

12-14 oz Pretzel Crisps, or use regular pretzels
1/2 block of white almond bark or candy coat
1/3-1/2 c. crushed starlight mints or candy canes
parchment paper

Line two cookie sheets with parchment paper.  Spread a thin layer of pretzels over the cookie sheet.  They can be overlapping a little bit.  Follow the directions on your bark to melt.  Using a butter knife generously drizzle the pretzels with the melted chocolate, making sure to overlap.  How heavily/lightly you drizzle the chocolate will depend on how much you like.  Before letting it set sprinkle crushed peppermints over the top.  Let set and break apart.  Enjoy.  (These will stay fresh in a ziploc or airtight container up to a week.)


post signature

12/13/12

Dark Chocolate Mint Truffle Cake Mix Cookies


We had a Christmas party to go to and there was a cookie exchange...so I needed to make 8 dozen cookies.  I don't enjoy baking.  I can bake, but I'm not that great at it and I really don't love it.  I think what I dislike is the mess.  Every time I bake I have to vacuum and clean up a fine flour dusting from everything...and I don't like messes.  So anyway, I wanted to try out a cake mix cookie because I loved the pumpkin cookies so much.  I found this recipe which looked really Christmas-y so I adapted it and it was great!  These cookies are really yummy and I love the gooey mint.  I used the Hershey's mint truffle kisses and chopped them up, but Andes chips would be great.  You can definitely play with this recipe.

I will definitely make these over and over again! AND I baked 8 dozen of them in only a couple hours which is a plus. These cookies would be a great little gift for your neighbors or a teacher.

Dark Chocolate Mint Cake Mix Cookies
recipe adapted from rubyreduction.com

makes 2 dozen cookies

1 box chocolate cake mix (I used Duncan Hines Dark Chocolate Fudge)
2 eggs
1/2 c. oil (I used a little bit less than that)
1 c. chopped Hershey's kisses, your favorite flavor will be great.  I used mint truffle.

The best way to chop the kisses is to unwrap them all and refrigerate at least an hour.  Then chop them up and measure out 1 generous cup. Preheat the oven to 350.  In a large bowl mix together cake mix, eggs & oil with a hand mixer until everything is blended well, no clumps in the mix.  Stir in the chopped kisses.  Roll into balls, about 1-1 1/2 inches, and bake 10 minutes.  Let cool completely.
 

post signature

12/2/12

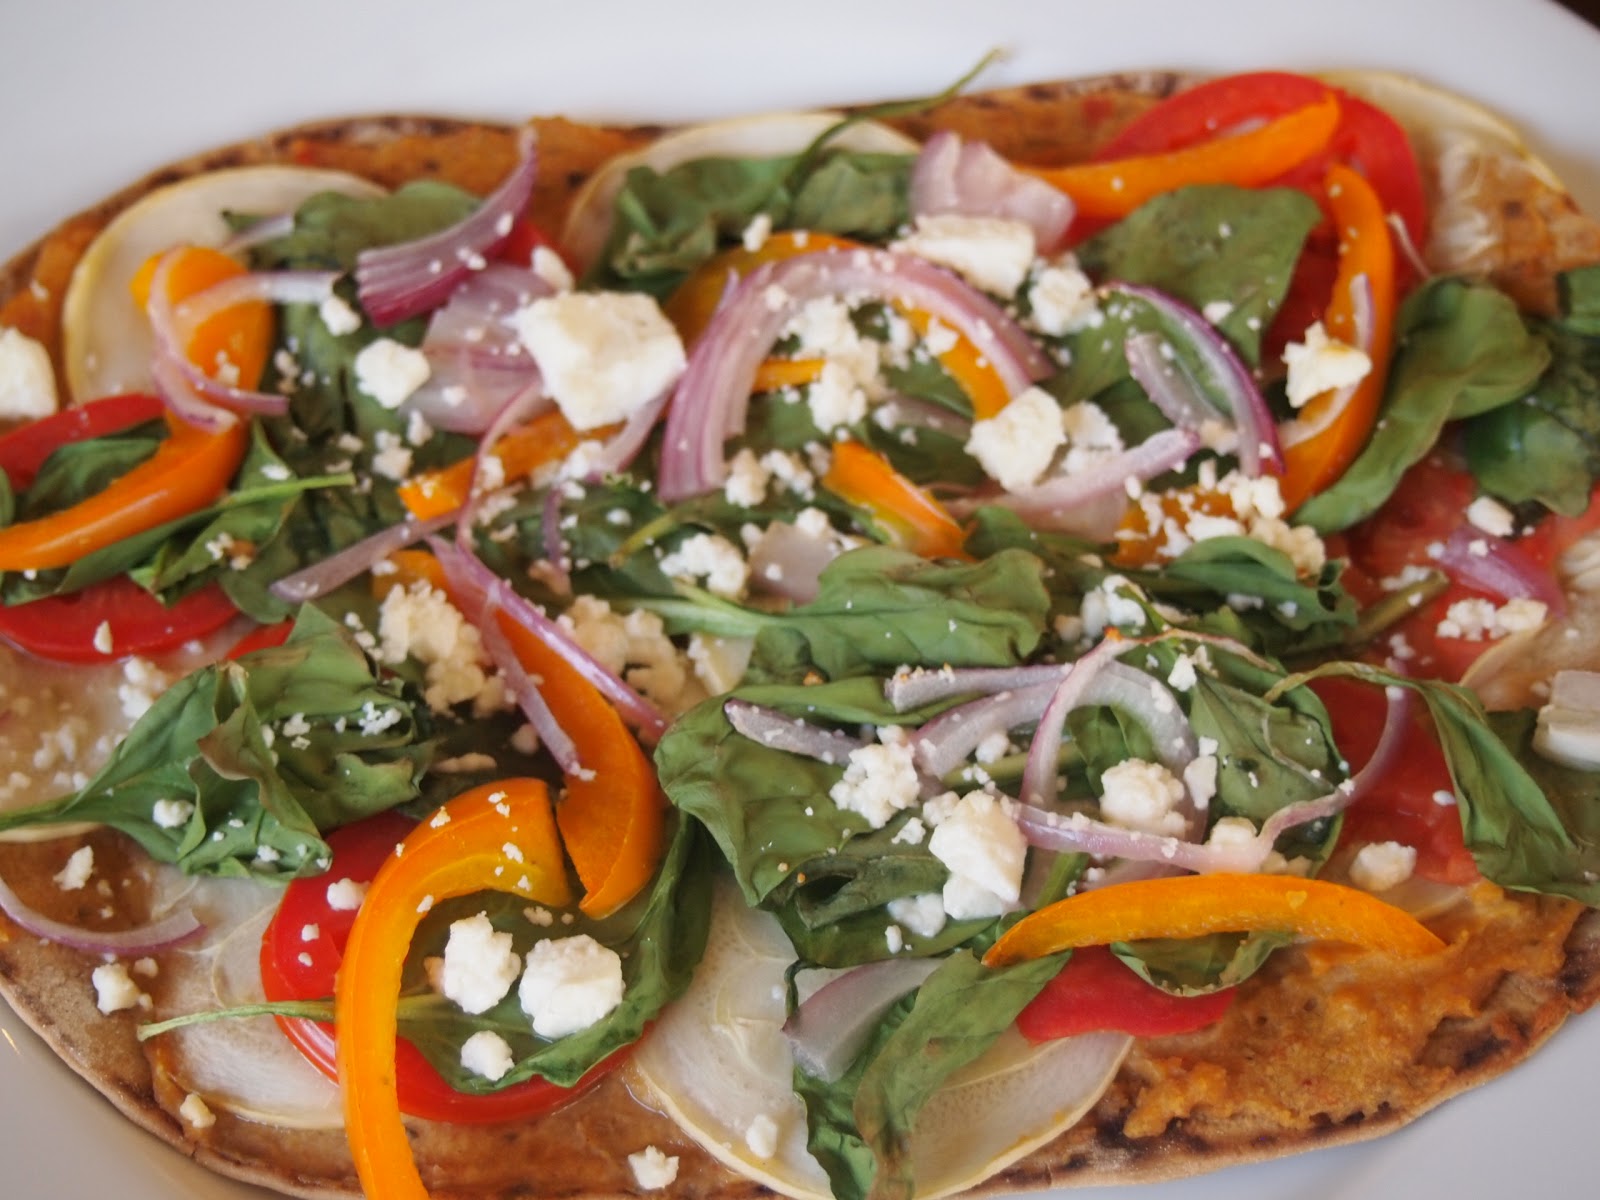
Roasted Veggie Flatbread


This is my go-to lunch lately and sometimes dinner. What can I say, I get in a rut.  This is very similar to the Greek hummus pizza, just less cheese and no making crust so you can actually throw it together in a couple minutes and just bake while you put your kids down for a nap.  Or whatever you do at your house in 10 minutes.  This is the perfect use for the roasted garlic hummus, but store bought hummus is great on it also.  If you're eating vegan just skip the feta.  But...the feta is really good on here so I pretty much never skip it.  Any veggie would be great on this so go for whatever you have/like.

Roasted Veggie Flatbread

1 flatbread, wrap or tortilla ( I use Flat Out wraps)
2 Tb. Hummus
Zuchinni or yellow squash, very thinly sliced 
Tomato, thinly sliced
Spinach (Just enough to cover the wrap)
Bell pepper, any color, thinly sliced
Red onion, thinly sliced
2-3 Tb feta, crumbled

Preheat the oven to 425.  Spray a piece of foil with cooking spray and lay the wrap or tortilla on it.  Spread the hummus all over the wrap.  Layer the squash, tomato, spinach, bell pepper and onion.  Sprinkle on the feta and bake for 10-12 minutes.  
 
 
post signature

11/26/12

Carrabba's Bread Dip Mix


We live in a somewhat new/smallish suburb of Phoenix and when we first moved out here, there wasn't much. When Carrabba's opened we were there.  Rob instantly became obsessed with their herb bread dip and insisted I find a way to make some.  Immediately.  So naturally I googled "Carrabba's bread dip mix" and up popped the copycat recipe!  I love this recipe because you mix up all of the dry herbs and it stays fresh pretty much forever so you can keep it on hand.  Mix some with fresh garlic and olive oil and you have an instant Italian appetizer.  I like to bring this to people with a homemade meal and everyone loves it.  Really, everyone.

This would make a great little gift for your neighbors in a small jar, and is super simple to throw together.  I usually buy my dried herbs in the little packets on the Mexican food aisle.  They are super cheap ($.89.)

Carrabba's Bread Dip Mix
recipe from food.com

1 Tb crushed red pepper flakes
1 Tb. black pepper
1 Tb. dried oregano
1 Tb. dried rosemary
1 Tb. dried basil
1 Tb. dried parsley
1 Tb. granulated garlic
1 tsp. sea salt
fresh garlic cloves & olive oil for serving

Mix all herbs & salt together in a small bowl.  Store in a jar or ziploc bag until you're ready to use.  To serve, crush or grate a clove of garlic on a plate and mix 1 Tb. herb mix in with the garlic.  Cover with desired amount of olive oil and dip a baguette or french bread in the oil mixture. 

post signature